Windows Phone

Security helper class that encrypt/decrypt settings and files

Even though the Windows Phone platform is more secure than either iOS or Android, it is always good practice to encrypt sensitive data.

I created a small SecurityHelper class that handles the encryption and the decryption of application settings and files.

The usage of the class is easy as:

SecurityHelper.WriteSetting("Username", "Sébastien");

string username = SecurityHelper.ReadSetting("Username");

The complete usage is described in the following sample code (which is also available in the downloadable Sample project below):

using System.Diagnostics;
using DotNetApp;

namespace SecurityHelperApp
{
    public partial class MainPage
    {
        public MainPage()
        {
            InitializeComponent();

            // Write and read an ApplicationSetting into the IsolatedStorageSettings
            WriteReadSettingExample();

            // Write and read a file with the specified string content
            WriteReadFileWithStringContentExample();

            // Write and read a file in a sub folder with the specified string content
            WriteReadFileInSubFolderWithStringContentExample();

            // Write and read a file with the specified bytes content
            WriteReadFileWithByteContentExample();
        }

        #region Private Methods

        private void WriteReadSettingExample()
        {
            SecurityHelper.WriteSetting("Username", "Sébastien");

            string username = SecurityHelper.ReadSetting("Username");

            Debug.Assert(username == "Sébastien");
        }

        private void WriteReadFileWithStringContentExample()
        {
            SecurityHelper.WriteFile("File1.txt", "I love Windows Phone");

            string content = SecurityHelper.ReadFile("File1.txt");

            Debug.Assert(content == "I love Windows Phone");
        }

        private void WriteReadFileInSubFolderWithStringContentExample()
        {
            SecurityHelper.WriteFile("Metro/SubFolder/File3.txt", "I love the Metro design");

            string content = SecurityHelper.ReadFile("Metro/SubFolder/File3.txt");

            Debug.Assert(content == "I love the Metro design");
        }

        private void WriteReadFileWithByteContentExample()
        {
            byte[] content = new byte[] {1, 2, 3, 4, 5};
            SecurityHelper.WriteFile("File2.txt", content);

            byte[] readContent;
            SecurityHelper.ReadFile("File2.txt", out readContent);

            Debug.Assert(content[0] == readContent[0] && content[1] == readContent[1] && content[2] == readContent[2] && 
                content[3] == readContent[3] && content[4] == readContent[4]);
        }

        #endregion
    }
}

Download SecurityHelper
Download Sample project
How to create a spinner control

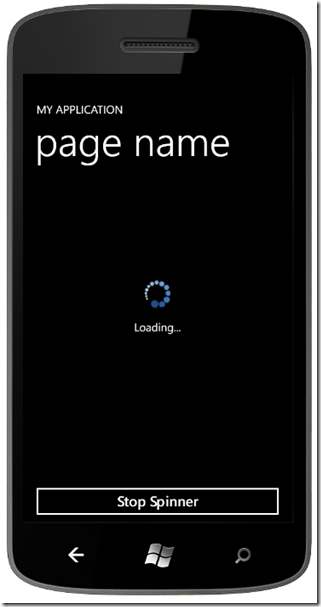
Most of the commercial components of Windows Phone contain a spinner control. However, if you can afford to buy a licence, you can use the one I provide below.

Here is a screenshot:

Spinner

To include the SpinnerControl in your project, you need to:

1- Unzip SpinnerControl.zip.
2- Add the three unzipped files to your project in the root.
3- Set the build action of the Spinner.png to Content
4- Add the SpinnerControl XAML code.

If you look at my sample project, which is an empty Windows Phone application (see download link at end of blog post), you will see:

    <DotNetApp:SpinnerControl Grid.RowSpan="2"
                              IsSpinning="True"
                              Status="Loading..."
                              VerticalAlignment="Center"
                              x:Name="spinner"/>

The simple SpinnerControl that I provide contains only 2 bindable properties:

IsSpinning: When it is set to true, the spinner rotates and it is visible. When it is set to false, the control is collapsed.

Status: This property is optional and it is used to put text under the spinner. It is useful if you wish to display the progress.

If we look at the file in more detail, SpinnerControl.xaml has is two important parts:

1- The Storyboard to rotate the image

    <Storyboard x:Name="StoryBoardAnimateSpinner">

      <DoubleAnimation AutoReverse="False"
                       Duration="0:0:2"
                       From="0"
                       RepeatBehavior="Forever"
                       Storyboard.TargetName="SpinnerTransform"
                       Storyboard.TargetProperty="Angle"
                       To="360" />

    </Storyboard>

This storyboard can be translated to: The image will rotate through 360 degrees every two seconds at a constant rate of rotation, and will continue to rotate forever. If you wish, you can set it to rotate through 360 degrees at a different speed, for example, every five seconds instead of every two seconds. You simply need to modify the Duration property.

2- The Image

    <Image Height="50"
           Margin="10,10"
           Source="/Spinner.png"
           Stretch="Uniform"
           Width="50"
           x:Name="spinImage">

      <Image.RenderTransform>

        <RotateTransform x:Name="SpinnerTransform"
                         CenterX="25"
                         CenterY="25" />

      </Image.RenderTransform>

    </Image>

The Height and Width of spin image need to be equal, otherwise, you’ll get a weird rotation. The CenterX and CenterY need to be half the value of the Height (or Width). The image Spinner.png that I provided in the SpinnerControl is 40 x 40, but in the above code, I specified 50 x 50 and I made sure to set the Stretch property to Uniform.

The other control in the SpinnerControl is a TextBlock which you probably know. You can configure it with your own values and you can even add dependency properties to the control to make it more general.

Download SpinnerControl
Download Sample project

Running two emulators can help to design and debug

Recently, I discovered involuntarily that it is possible to run simultaneously the Windows Phone Emulator 512 MB and the Windows Phone Emulator 256 MB at the same time.

image

While tweaking and adjusting the user interface, having both emulators side-by-side can help you compare your changes.

Make sure you download the Windows Phone SDK 7.1.1. As a reminder, it is always a best practice to test if your application can run on a 256 MB device.

After installing the Windows Phone SDK 7.1.1, you’ll have this selection of emulators:

image

1- Start debugging with the 512 MB emulator.
2- Stop debugging.
3- Select the 256 MB emulator and start debugging.
4- Now, you can start manually your application on the 512 MB emulator.

How to save ListView and ScrollViewer family controls scroll position

One of the suggested guidelines when creating a Windows Phone application is that when the user quits an application, the states of the pages are saved, so that when the user re-opens the application, it feels like he never quit.

With the Mango update, it is now possible to save the states of application pages, providing there is enough memory. However, there will be some cases when the application will tombstone. The purpose of my utility static class StateManager will help to save a ListView/ScrollViewer scroll position or other controls that have an internal ScrollViewer.

Before explaining my utility class works, let’s see what happen when the scroll position is not saved:

1- Create a “Windows Phone Databound Application”.
2- Run the app then scroll the list to the last item.
3- Press the Start button.
4- Press the Back button.

The state is preserved. Great, but…

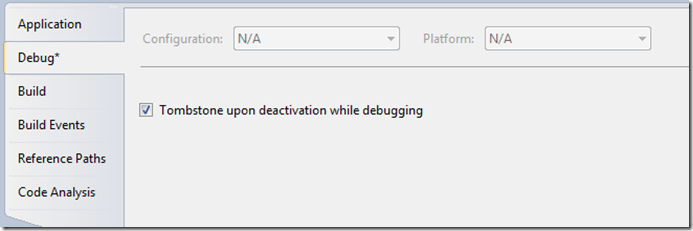
Now, stop debugging the application and go to the properties of the project. In the Debug section, check the option “Tombstone upon deactivation while debugging”. This is the only way to force the tombstoning process while debugging.

Tombstone

Execute the last 3 steps and you’ll see that the list scroll position is not saved.

To fix this issue, insert the StateManager class (provided at the end of the article) in your project and call StateManager.SaveScrollViewerOffset and StateManager.RestoreScrollViewer on the list that you want to save/restore scroll position. The best places to insert those calls are in the method OnNavigatedTo and OnNavigatedFrom.

protected override void OnNavigatedTo(System.Windows.Navigation.NavigationEventArgs e)
{
    base.OnNavigatedTo(e);

    StateManager.RestoreScrollViewerOffset(MainListBox);
    
}

protected override void OnNavigatedFrom(System.Windows.Navigation.NavigationEventArgs e)
{
    base.OnNavigatedFrom(e);

    StateManager.SaveScrollViewerOffset(MainListBox);
}

Download StateManager.cs
Download Sample project

How to fix the standard header of a pivot control using a style and how to fix a page using the TitleControl

When I first read the excellent book 101 Windows Phone 7 Apps by Adam Nathan, I was surprised to learn that if you create a “Windows Phone Application” or a “Windows Phone Pivot Application” in Visual Studio, the application title is not displayed as it is the built-in metro applications of the Windows Phone OS.

If you want to see the differences for yourself, follow these steps:

1- Create a “Windows Phone Pivot Application”.
2- In the MainPage.xaml, change the “MY APPLICATION” title to “SETTINGS”.
3- Change the header name of the first pivot item from “first” to “system”.
4- Change the header name of the second pivot item from “second” to “application”.
5- Run the application.

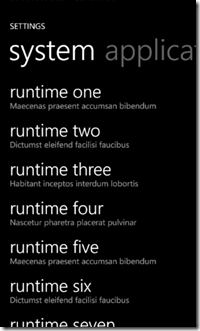
You’ll see:

BadSettingsPage

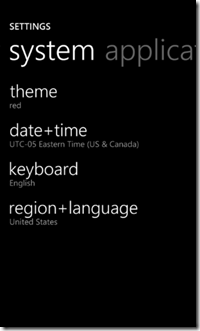
Now, exit the application and go in the “Settings” application of the emulator, then look at the page:

GoodSettingsPage

Do you see a difference in the “SETTINGS” application title?

image

To approximate the same design as the OS, the author suggests a style that you can apply to your pivot control:

<Style x:Key="PivotStyle" TargetType="controls:Pivot"> <Setter Property="TitleTemplate"> <Setter.Value> <DataTemplate> <TextBlock FontFamily="{StaticResource PhoneFontFamilySemiBold}" FontSize="{StaticResource PhoneFontSizeMedium}" Margin="-1,-1,0,-3" Text="{Binding}" /> </DataTemplate> </Setter.Value> </Setter> </Style> 

Apply the style:

    <controls:Pivot Title="SETTINGS" Style="{StaticResource PivotStyle}"> 

The same issue happens with every page (PhoneApplicationPage). Instead of applying the fix to all the pages of an application, I created the TitleControl (the code is available for download at the end of the article).

Two of the goals behind the TitleControl were:

1- Get rid of all the XAML code that displays the header.

2- Remove the unnecessary extra grid that displays the header and the content. Remember, if you can have less containers like panels, a grids, or stack panels in a page, your loading speed will be faster.

So, instead of having the following XAML code:

<Grid x:Name="LayoutRoot" Background="Transparent">

 <Grid.RowDefinitions> <RowDefinition Height="Auto"/> <RowDefinition Height="*"/> </Grid.RowDefinitions> <!--TitlePanel contains the name of the application and page title--> <StackPanel x:Name="TitlePanel" Grid.Row="0" Margin="12,17,0,28"> <TextBlock x:Name="ApplicationTitle" Text="MY APPLICATION" Style="{StaticResource PhoneTextNormalStyle}"/> <TextBlock x:Name="PageTitle" Text="page name" Margin="9,-7,0,0" Style="{StaticResource PhoneTextTitle1Style}"/> </StackPanel> <!--ContentPanel - place additional content here--> <Grid x:Name="ContentPanel" Grid.Row="1" Margin="12,0,12,0"> <TextBlock Text="Hello World" /> </Grid>

 </Grid> 

The code can be reduced to:

<Grid x:Name="LayoutRoot" Background="Transparent"> <Grid.RowDefinitions> <RowDefinition Height="Auto" /> <RowDefinition Height="Auto" /> </Grid.RowDefinitions> <Controls:TitleControl TitleName="SETTINGS" PageName="theme" /> <TextBlock Grid.Row="1" Margin="24,0" Text="Hello World" /> </Grid> 

If you have a brand theme, you can override the color and the font directly in the TitleControl or you can add additional dependency properties to the control.

Download TitleControl
Download Sample project

How to mimic the application bar of the game hub and to avoid the splash screen bug

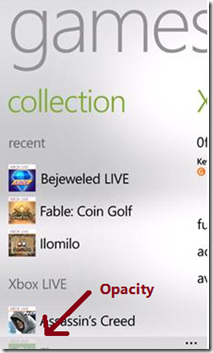
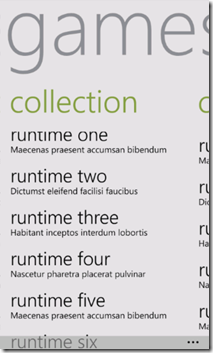
With the release of the Mango update, having a minimized application bar with an application using the panorama control is now part of the Metro experience. The best example is the games hub. The minimized application bar uses the Opacity property as you can see in the following picture.

Opacity

To mimic the application bar of the game hub, follow these 2 steps:

1- Add the following XAML code where the panorama control resides to add the application bar.

  <phone:PhoneApplicationPage.ApplicationBar> <shell:ApplicationBar BackgroundColor="DarkGray" ForegroundColor="Black" IsVisible="False" IsMenuEnabled="True" Mode="Minimized" Opacity="0.60" StateChanged="ApplicationBarStateChanged"> <shell:ApplicationBar.MenuItems> <shell:ApplicationBarMenuItem Text="MenuItem 1" /> <shell:ApplicationBarMenuItem Text="MenuItem 2" /> </shell:ApplicationBar.MenuItems> </shell:ApplicationBar> </phone:PhoneApplicationPage.ApplicationBar> 

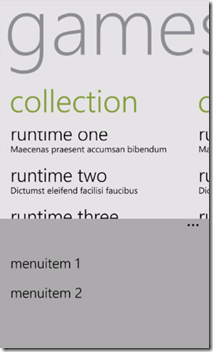
You’ll have this result:

ApplicationBarOpacity

2- In the page with the application bar, add the event handler ApplicationBarStateChanged.

private void ApplicationBarStateChanged(object sender, ApplicationBarStateChangedEventArgs applicationBarStateChangedEventArgs)
{
    ApplicationBar applicationBar = sender as ApplicationBar;

    if (applicationBar != null)
    {
        applicationBar.Opacity = applicationBarStateChangedEventArgs.IsMenuVisible ? 1 : 0.60;
    }
}

The application bar will use a solid color (i.e. no opacity) when it will be expanded. It’s easier to read like this:

ApplicationBarNoOpacity

When I implemented this behaviour in one of my applications, I discovered that the application bar was appearing while the splash screen was shown. It’s very subtle, but it feels like a bug. I saw this bug on some other applications in the Marketplace. Here is a screenshot with the splash screen with the application bar.

SplashScreenBug

To correct this bug, it’s very easy:

1- Make the application bar hidden by default in the XAML code. It’s already included in the first step at the top (IsVisible=”False”).

2- In the page of the application bar, add the event handler Loaded of the page, then add ApplicationBar.IsVisible = true.

private void MainPageLoaded(object sender, RoutedEventArgs e)
{
    if (!App.ViewModel.IsDataLoaded)
    {
        App.ViewModel.LoadData();
    }

    ApplicationBar.IsVisible = true;
}

If you are using the BindableApplicationBar of the Phone7.FX project, I highly suggest reading the perfect solution of Mark Monster that uses a Behavior.

Download Sample project

How to get the Internet connection type without blocking the UI

All Windows Phone applications that use Internet data should always check if there is a valid Internet connection. If there is no connection, a proper message should be displayed to the user. If your application relies on a specific server, don’t assume that Internet is not available if a call to the server returns an error, because the server might be down while the Internet is still available.

The proper way to check if you have an Internet connection (WIFI, Ethernet, or none) is calling the property:

NetworkInterface.NetworkInterfaceType

Unfortunately, even if it’s not obvious, calling this property on the UI thread can block the UI for many seconds. To avoid this problem, I created a NetworkInformationUtility class (the class and the sample project are available at the end of the post):

using System.Threading;
using Microsoft.Phone.Net.NetworkInformation;

namespace DotNetApp.Utilities
{
    public class NetworkTypeEventArgs {
        #region Constructor

        public NetworkTypeEventArgs(NetworkInterfaceType type, bool hasTimeout = false)
        {
            Type = type;
            HasTimeout = hasTimeout;
        }

        #endregion #region Properties

        public bool HasTimeout { get; private set; }

        public bool HasInternet
        {
            get { return Type != NetworkInterfaceType.None; }
        }

        public NetworkInterfaceType Type { get; private set; }

        #endregion }

    /// <summary> /// Static class to get the NetworkInterfaceType without blocking the UI thread. /// </summary> public static class NetworkInformationUtility {
        #region Fields

        private static bool _isGettingNetworkType;
        private static readonly object _synchronizationObject = new object();
        private static Timer _timer;

        #endregion #region Methods

        /// <summary> /// Get the NetworkInterfaceType asynchronously. /// </summary> /// <param name="timeoutInMs">Specifies the timeout in milliseconds.</param> public static void GetNetworkTypeAsync(int timeoutInMs)
        {
            lock (_synchronizationObject)
            {
                if (!_isGettingNetworkType)
                {
                    _isGettingNetworkType = true;

                    if (System.Net.NetworkInformation.NetworkInterface.GetIsNetworkAvailable())
                    {
                        Thread thread = new Thread(GetNetworkType) {IsBackground = true};
                        thread.Start(timeoutInMs);
                    }
                    else {
                        FireGetNetworkTypeCompleted(NetworkInterfaceType.None);
                    }
                }
            }
        }

        #endregion #region Delegates

        public delegate void NetworkTypeEventHandler(object sender, NetworkTypeEventArgs networkTypeEventArgs);

        #endregion #region Events

        public static event NetworkTypeEventHandler GetNetworkTypeCompleted;

        #endregion #region Event Handlers

        private static void OnTimerElapsed(object state)
        {
            FireGetNetworkTypeCompleted(NetworkInterfaceType.None, true);
        }

        #endregion #region Private Methods

        private static void GetNetworkType(object state)
        {
            _timer = new Timer(OnTimerElapsed, null, (int)state, 0);

            // This is a blocking call, this is why a thread is used to let the UI to be fluid NetworkInterfaceType type = NetworkInterface.NetworkInterfaceType;

            _timer.Dispose();
            _timer = null;

            FireGetNetworkTypeCompleted(type);
        }

        private static void FireGetNetworkTypeCompleted(NetworkInterfaceType type, bool hasTimeout = false)
        {
            lock (_synchronizationObject)
            {
                if (_isGettingNetworkType)
                {
                    _isGettingNetworkType = false;

                    NetworkTypeEventHandler networkTypeEventHandler = GetNetworkTypeCompleted;

                    if (networkTypeEventHandler != null)
                    {
                        networkTypeEventHandler(null, new NetworkTypeEventArgs(type, hasTimeout));
                    }
                }
            }
        }

        #endregion }
}

Here are the steps to use this class in your code:

  1. Add the NetworkInformationUtility.cs to your project.
  2. Attach method to the event NetworkInformationUtility.GetNetworkTypeCompleted.
  3. Call NetworkInformationUtility.GetNetworkTypeAsync(3000 /*timeout in ms*/);
  4. Retrieve the result on the GetNetworkTypeCompleted method that you attached to the event.

Code sample:

using System.Windows;
using DotNetApp.Utilities;

namespace NetworkInformationApp
{
    public partial class MainPage {
        public MainPage()
        {
            InitializeComponent();
        }

        protected override void OnNavigatedTo(System.Windows.Navigation.NavigationEventArgs e)
        {
            base.OnNavigatedTo(e);

            NetworkInformationUtility.GetNetworkTypeCompleted += GetNetworkTypeCompleted;

            NetworkInformationUtility.GetNetworkTypeAsync(3000); // Timeout of 3 seconds }

        protected override void OnNavigatedFrom(System.Windows.Navigation.NavigationEventArgs e)
        {
            base.OnNavigatedFrom(e);

            NetworkInformationUtility.GetNetworkTypeCompleted -= GetNetworkTypeCompleted;
        }

        private void GetNetworkTypeCompleted(object sender, NetworkTypeEventArgs networkTypeEventArgs)
        {
            string message;

            if (networkTypeEventArgs.HasTimeout)
            {
                message = "The timeout occurred";
            }
            else if (networkTypeEventArgs.HasInternet)
            {
                message = "The Internet connection type is: " + networkTypeEventArgs.Type.ToString();
            }
            else {
                message = "There is no Internet connection";
            }

            // Always dispatch on the UI thread Dispatcher.BeginInvoke(() => MessageBox.Show(message));
        }
    }
}

Download NetworkInformationUtility.cs
Download Sample project